¶ Tutorial #2 - Sending Transactions and UI Components
This tutorial explains how to build an application that sends transactions, the /lib sub-directory of your module, UI components, and your first look at the Saito API.
¶ Creating Module Directory
Navigate into your /mods directory and create a folder with the name tutorial02. Within that directory create the file tutorial02.js.
Copy the text below into this this file:
var ModTemplate = require('../../lib/templates/modtemplate');
const MainUI = require('./lib/main');

class Tutorial02 extends ModTemplate {

  constructor(app) {

    super(app);

    this.name            = "Tutorial02";
    this.slug            = "tutorial02";
    this.description     = "Transactions and UI Components";

    this.ui              = new MainUI(app, this);

  }

}

module.exports = Tutorial02;
¶ Module-Level Functions
¶ UI Components & Rendering
Notice above the addition of a UI component named MainUI on line 2, which pulls code from the ./lib/main.
Saito modules can include a /lib directory which contains subclasses and template files, which is where our UI component will be created later in this tutorial.
In our constructor, we instantiate the MainUI component and save a reference to it as this.ui (line 14). We then update the default render() function (by including the following modified render() definition in our Tutorial02 class) to make this UI component to render itself to the screen:
  async render() {
    this.addComponent(this.ui);
    await super.render();
  }
The render function we inherit from modtemplate looks for UI components added by the addComponent function and calls render on each of them.
¶ Creating and Sending Transactions
The second function we will add is responsible for sending a transaction, and is a useful reference for the data structure of transactions and the steps required to form and propogate them.
See below for a breakdown of what's going on here.
  async sendTutorial02Transaction() {

    let newtx = await this.app.wallet.createUnsignedTransaction();
    newtx.msg = {
      module: this.name,
      data: {
        random : Math.random()
      }
    };
    await newtx.sign();

    this.app.network.propagateTransaction(newtx);

  }
¶ app Object
Note that most of the functions that our module needs live on the app object submitted as input to the constructor. app contains a number of subclasses (.wallet, .storage, .network, .blockchain) containing functions to perform useful Web3 procedures like broadcasting transactions or returning addresses. In short, app is the Saito API, and all modules save a reference to it as this.app.
If you are creating a transaction, for instance, you'd want functions that live in the .wallet object. When sending the transaction, you'd want functions that live in the .network object.
¶ Creating Transactions
this.app.wallet.createUnsignedTransaction()
We use the function createUnsignedTransaction() from app.wallet to create and return a transaction.
This function is normally provided with the address to which you want to send the transaction, and can optionally be provided with fee information. Since none of this information is being provided it defaults to creating a transaction that is addressed to the sender.
¶ Modifying Transaction Data
newtx.msg = {
    module: this.name,
    data: {
      random : Math.random()
    }
  };
We then fill out the msg field to contain the information we want to include in the transaction. You can provide whatever information you want -- in this case we'll just generate a random number so that we can see our application is updating and sending a unique transaction every time it is asked.
There are no conditions about what can be included in the msg object, but we generally follow a convention of including module, request (a short text description), and data.
¶ Signing and Sending Transactions
await newtx.sign();
this.app.network.propagateTransaction(newtx);
Finally we sign the transaction before sending it out into the network with propagateTransaction(). The function is asynchronous so you may want to await it, but is usually not necessary.
¶ Creating our UI Component
Recall that our UI component was defined via:
const MainUI = require('./lib/main');
so the next step is to create a /lib directory in our module folder and populate it with a file named main.js.
The content of /lib/main.js is provided below:
const Tutorial02MainTemplate = require('./main.template');

class Tutorial02Main {

  constructor(app, mod) {

    this.app = app;
    this.mod = mod;

  }

  render() {
    this.app.browser.addElementToDom(Tutorial02MainTemplate());

    let btn = document.querySelector('.tutorial02-button');
    if (btn) {
      btn.onclick = (e) => {
        alert('sending a transaction!');
        this.mod.sendTutorial02Transaction();
      };
    }
  }

}

module.exports = Tutorial02Main;
¶ Rendering
UI Components in Saito typically have two functions: a render() function which writes content to the screen, and an attachEvents() function for UI logic, but attachEvents() is omitted here for simplicity. References to app and the module are passed to the component so we have access to all the functionality.
Note that this main.js file relies on one more file: main.template.js, which simply defines the HTML which will structure the UI. The contents of /lib/main.template.js are:
module.exports = () => {

    return `

        <div id="tutorial02-main" class="saito-container">

          <h2>Click to Send Transaction</h2>

          <input type="button" class="tutorial02-button" value="Click Me!" />

      	    </div>

  	`;
};
When the render() function is executed, the module checks for the existence of an HTML document and writes the HTML returned from its template file into the BODY of that document. This includes a button with the class tutorial02-button to which it attaches the event.
¶ Testing
Recompile your application and visit the /tutorial02 module in your browser. If you are running a standard local node, you can navigate to it via: http://localhost:12101/tutorial02.
You will see the button appear and if you click on it you'll get the alert message and your browser will send a transaction into the network.
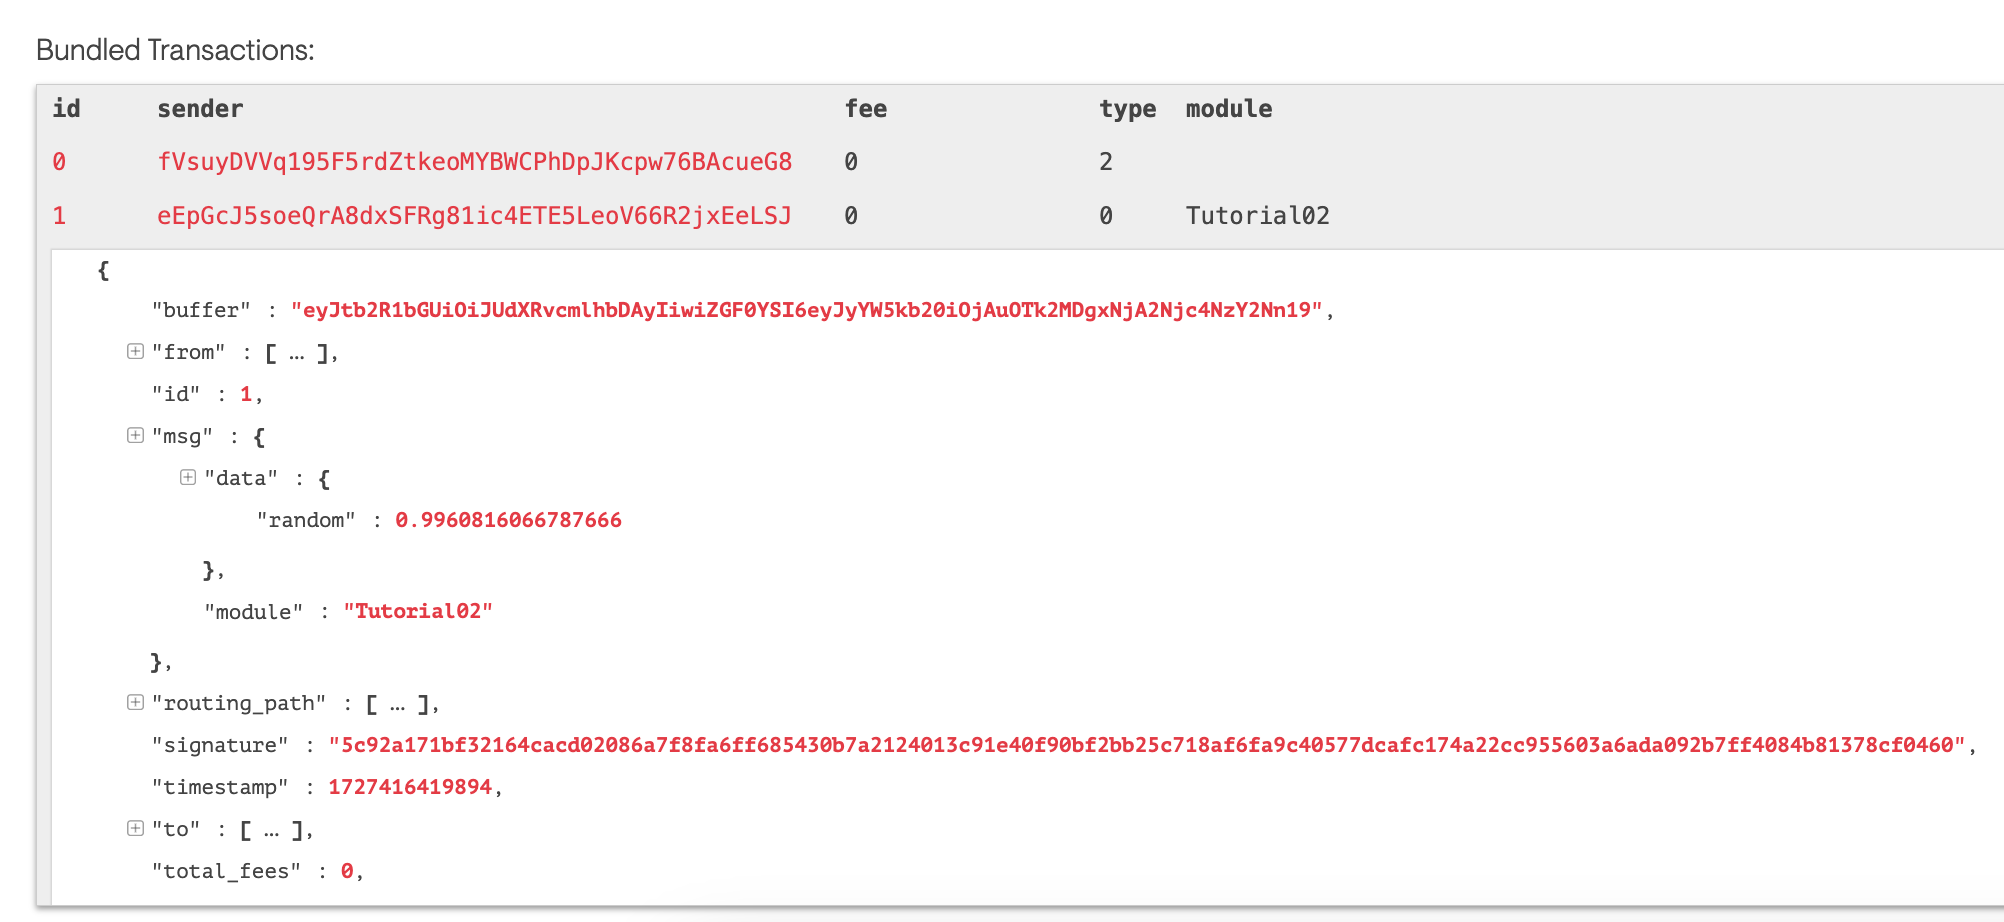
If you'd like to confirm your transaction was sent, make sure you are running the explorer module. Visit to see a list of the latest blocks your machine has produced.
On a standard local node, your block explorer can be found at http://localhost:12101/explorer.
You should be able to navigate to the latest block and will be able to find your transaction listed in that block, as per the image above. You should be able to see the data that your module inserted into your transaction has been included and can be viewed on the blockchain.
¶ Summary
In this tutorial, we have learned:
- including and rendering UI components
- standard formatting of UI components
- the Saito API
appand some of its subsections: wallet, network - Well formatted data for transactions
- how to create and send transactions
¶ Up Next
In our next tutorial, we will modify this application to show how to listen to these transactions and process them when we receive them over the network.
¶ Reference Materials
- The complete
tutorial02code can be referenced here.