¶ Tutorial #3 - Receiving and Responding to Transactions
In this tutorial we build on Tutorial 2, which allows a users to send a transaction on the network by clicking a button, to receive and process a transaction in an application.
¶ Getting Started
Navigate into your /mods directory and create a folder with the name tutorial03. Within that directory create the file tutorial03.js.
¶ Creating the Module
Copy the text below into this file.
var ModTemplate = require('../../lib/templates/modtemplate');
const MainUI = require('./lib/main');

class Tutorial03 extends ModTemplate {

  constructor(app) {

    super(app);

    this.name            = "Tutorial03";
    this.slug            = "tutorial03";
    this.description     = "Sending and Receiving Transactions";

    this.ui              = new MainUI(this.app, this);

  }


  async render() {
    this.addComponent(this.ui);
    await super.render();
  }

}

module.exports = Tutorial03
¶ Creating Module Transactions
To create and send transactions this module can receive, we define the function sendTutorial03Transaction() as below. This function fetches our wallet address, and then calls the Saito Wallet to create a transaction addressed to our address.
We attach our JSON object to the msg field of this transaction, and include the name of our module and a random number that we will display when we receive the transaction. Once the transaction has been created, we sign it and propagate it out onto the network.
  async sendTutorial03Transaction() {

    let address = await this.app.wallet.getPublicKey();

    let newtx = await this.app.wallet.createUnsignedTransaction(address);

    newtx.msg = {
      module: this.name,
      data: {
        random : Math.random()
      }
    };
    await newtx.sign();

    await this.app.network.propagateTransaction(newtx);

  }
These are all (functionally) the same as Tutorial 02, so let's do something new.
¶ Listening for Inbound Transactions
Next, we add the function onConfirmation() (inside the class). This function runs automatically whenever the module receives a transaction if the transaction includes the name of the module in its message. Technically, every module has a function shouldAffixCallbackToModule to determine whether the module should execute onConfirmation on the transaction. shouldAffixCallbackToModule is defined in modtemplate to just check the module name against a "module" field in the transaction message.
async onConfirmation(blk, tx, conf) {

    if (Number(conf) == 0) {
            if (this.app.BROWSER) {
    		this.ui.receiveTransaction(tx);
      }
    }

  }
We check two things to see if we want to process the transaction. First, we only want to process the transaction once so we check that conf == 0 (conf is a BigInt and either needs to be explicitly typed as a Number or use Javascript's more flexible equality operator). conf represents the number of confirmations of the block, counting up from 0. Second, we check that we are running the code in the browser because we are going to update the UI and a full node does not have a defined html document to change.
We will learn more about listening for transactions from other modules, or handling different requests from the same module in later tutorials.
¶ Reacting to Transactions
All that remains is to create our UI Component so that it connects to these new functions. Copy the /lib/main.js file from Tutorial 02 or start a new one with the standard constructor and include the following functions:
  render() {
    this.app.browser.addElementToDom(Tutorial03MainTemplate());
    this.attachEvents();
  }

  attachEvents() {
    let btn = document.querySelector('.tutorial03-button');

    if (btn) {
      btn.onclick = (e) => {
        this.mod.sendTutorial03Transaction();
      };
    }
  }

  receiveTransaction(tx) {
    let txmsg = tx.returnMessage();

    this.app.browser.addElementToSelector(
      `<div>TX received - random: ${txmsg.data.random}</div>`,
      `.tutorial03-received-transactions`
    );
  }
The main difference with Tutorial 02 is that we have the receiveTransaction(tx) function, which is called by onConfirmation() instead of the alert inside the button's click event.
receiveTransaction(tx) extracts the message data from the transaction and displays the transaction data in the UI.
Because modules often have to modify html on the DOM, app.browser includes a number of utilities to make our lives easier, but feel free to use querySelectors if you are more comfortable with that. For more information on the browser API, see here
¶ Testing
Recompile Saito with this module active and visit the module page. When you click on the button you will send a transaction out into the network, which will then be returned to you as part of the next block.
At that point (within about 20 seconds) you should see your screen update with the random number that was included in the transaction that you sent. The reason for the delay is that onConfirmation() waits for the transaction to be included in a block before running.
You can confirm that the random number is the same that was included in the transaction by checking the message field of the transaction you created in the block explorer as previously. You can open the block explorer is a second tab because it does not run the main saito.js script.
¶ Troubleshooting
If your browser does not update after you click the button and wait 10-20 seconds, check your console log to see if you have the following error message.
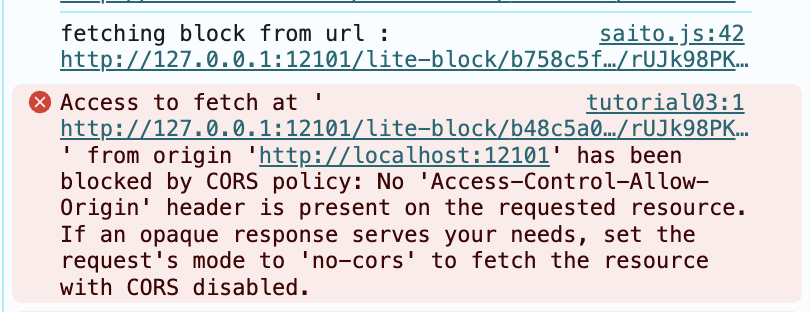
If your browser is showing this, it means that your browser is getting notified that a new block is available, but you need to modify the Saito Core server to permit cross-origin requests. You can do this by opening the file /lib/saito/core/server.ts. Look for this section and uncomment the two lines necessary. Recompile and restart the server and this issue will go away. You may also be able to avoid the problem by accessing your local server at the IP address "127.0.0.1" instead of "localhost".
//
// CORS -- uncomment for local CORS Cross-Origin Requests by Default
//
//var cors = require('cors');
const expressApp = express();
//expressApp.use(cors());
If you are doing development locally you may want to leave this section uncommented by default. When you deploy your application on the network, host it on a normal domain and you will not need to enable CORS.
¶ Summary
In this unit, we learned about:
- using
onConfirmationto listen for on-chain transactions - protecting servers from running UI manipulating code
- DOM manipulating convenience functions in
app.browser
¶ Up Next
In our next tutorial we’ll create use what we've learned so far to build an application that
¶ Reference Materials
- The complete
tutorial03code can be referenced here.